Install QEMU/KVM Server on Debian 10 Headless Server
Kernel based Virtual Machine (KVM) is a widely used free and open source type 2 hypervisor for Linux distributions.
This post described a workthrough on how to install and configure QEMU/KVM on a Debian 10/buster server.
![]()
1. Prerequistes
- A headless Debian 10/buster server, of which ip address is: 192.168.1.100.
- All commands in this walkthrough were input over SSH session to above server.
- A VNC (Virtual Network Computing) client in client computer. Available VNC clients are:
2. Check whether virtualization extension is enabled
Login to the Debian 10 server and run the below command:
$ egrep --color 'vmx|svm' /proc/cpuinfo
flags		: fpu vme de pse tsc msr pae mce cx8 apic sep mtrr pge mca cmov pat pse36 clflush dts acpi mmx fxsr sse sse2 ss ht tm pbe syscall nx pdpe1gb rdtscp lm constant_tsc arch_perfmon pebs bts rep_good nopl xtopology nonstop_tsc cpuid aperfmperf pni pclmulqdq dtes64 monitor ds_cpl vmx smx est tm2 ssse3 sdbg fma cx16 xtpr pdcm pcid dca sse4_1 sse4_2 x2apic movbe popcnt tsc_deadline_timer aes xsave avx f16c rdrand lahf_lm abm 3dnowprefetch cpuid_fault epb cat_l3 cdp_l3 invpcid_single pti ssbd ibrs ibpb stibp tpr_shadow vnmi flexpriority ept vpid ept_ad fsgsbase tsc_adjust bmi1 hle avx2 smep bmi2 erms invpcid rtm cqm rdt_a rdseed adx smap intel_pt xsaveopt cqm_llc cqm_occup_llc cqm_mbm_total cqm_mbm_local dtherm arat pln pts md_clear flush_l1d
If the output contains vmx then you have a Intel based processor and svm confirms that it is AMD processor.
3. Start default network
List available networks for VMs:
$ sudo virsh net-list --all
 Name      State      Autostart   Persistent
----------------------------------------------
 default   inactive   no          yes
Here we need to make the default network active and auto-start later:
$ sudo virsh net-start default
$ sudo virsh net-autostart default
And add vhost_net kernel module to improve the VMs performance:
$ sudo modprobe vhost_net
$ echo "vhost_net" | sudo tee -a /etc/modules
Check available mod:
$ lsmod | grep vhost
vhost_net              24576  0
vhost                  49152  1 vhost_net
tap                    28672  1 vhost_net
tun                    49152  2 vhost_net
4. Install QEMU-KVM and Libvirt packages
Simply run:
$ sudo apt update
$ sudo apt install qemu-kvm libvirt-clients libvirt-daemon-system bridge-utils libguestfs-tools genisoimage virtinst libosinfo-bin
Once above packages are installed successfully then libvirtd service will be started automatically, run the below systemctl command to verify the status
$ systemctl status libvirtd.service
● libvirtd.service - Virtualization daemon
   Loaded: loaded (/lib/systemd/system/libvirtd.service; enabled; vendor preset:
   Active: active (running) since Tue 2021-06-22 10:18:37 CST; 4h 26min ago
     Docs: man:libvirtd(8)
           https://libvirt.org
 Main PID: 2077 (libvirtd)
    Tasks: 64 (limit: 32768)
   Memory: 62.2M
   CGroup: /system.slice/libvirtd.service
           ├─2077 /usr/sbin/libvirtd
           ├─...
4.1 Allow normal user to manage virtual machine
If you want normal user (e.g., myuser) can manage virtual machines, add the user to libvirt abd libvirt-qemu groups:
$ sudo adduser myuser libvirt
$ sudo adduser myuser libvirt-qemu
And refresh group membership with:
$ newgrp libvirt
$ newgrp libvirt-qemu
5. Create Linux bridge for KVM VMs
A networking bridge virbr0 has been created for test environment. But if you’d like to access your VMs over the network, an extra Linux bridge has to be created and attached to the physical nic of the Debian 10 server.
Here edit the network configuration file /etc/network/interfaces:
# This file describes the network interfaces available on your system
# and how to activate them. For more information, see interfaces(5).

# The loopback network interface
auto lo br0
iface lo inet loopback

# Set up interfaces manually,
# avoiding conflicts with, e.g., network manager
iface eth0 inet manual

# Bridge setup
iface br0 inet static
  bridge_ports eno1
    address 10.10.10.10
    broadcast 10.10.10.255
    netmask 255.255.255.0
    gateway 10.10.10.1
    bridge_stp off
    bridge_fd 0
    bridge_maxwait 0
    dns-nameservers 8.8.8.8 8.8.4.4
If you’d like bridge over DHCP, the
Bridge setupsection would be simpler:# Bridge setup iface br0 inet dhcp bridge_ports eth0 eno1
Restart networking service to enable changes:
$ sudo systemctl restart network-manager
Next confirm whether the beidge br0 were up:
$ ip a s br0
3: br0: <BROADCAST,MULTICAST,UP,LOWER_UP> mtu 1500 qdisc noqueue state UP group default qlen 1000
    link/ether fe:54:00:b5:c9:02 brd ff:ff:ff:ff:ff:ff
    inet 10.10.10.1/24 brd 10.10.10.255 scope global br0
       valid_lft forever preferred_lft forever
    inet6 fe80::7c49:43ff:feaf:4d4b/64 scope link
       valid_lft forever preferred_lft forever
You can check the current KVM network setting:
$ sudo virsh net-list --all
6. Create VM using an ISO image
Now create an Ubuntu 18.04 LTS VM.
First download the latest Ubuntu 18.04 LTS server ISO image. It was stored at, e.g., /data/iso/ubuntu-18.04.5-live-server-amd64.iso.
Let’s assume the VM virtual disks store at /data/vm/images.
Create VM by the command virt-install:
$ sudo virt-install \
    --name ubuntu-vm \
    --os-type linux \
    --os-variant=ubuntu18.04 \
    --virt-type=kvm \
    --ram 2048 \
    --vcpu=4 \
    --hvm \
    --noautoconsole \
    --cdrom=/data/iso/ubuntu-18.04.5-live-server-amd64.iso \
    --network=bridge=br0,model=virtio \
    --graphics vnc,listen=0.0.0.0 \
    --disk path=/data/vm/images/ubuntu.qcow2,size=40,bus=virtio,format=qcow2
Note:
- This command created a Ubuntu-18.04 VM, with 4 virtual CPUs, 2048 MB memory and 40 GB virtual disk.
--grahpics vnc,listen=0.0.0.0allows you can connent to the VM from any IP addreee. Otherwise, the default valuelisten=127.0.0.1only permits connect from the same computer of the VM.
The output:
Starting install...
Domain installation still in progress. You can reconnect to
the console to complete the installation process.
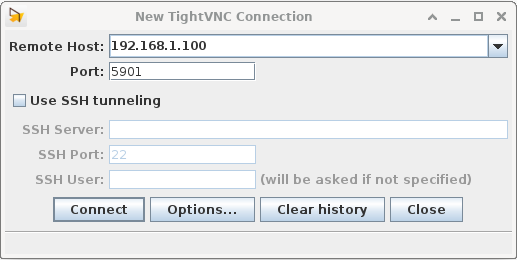
6.1 Connect the VM installation from client computer through VNC
Check VNC port with:
sudo virsh dumpxml ubuntu-vm | grep vnc
Output:
<graphics type='vnc' port='5901' autoport='yes' listen='127.0.0.1'>
Note the VNC port value 5901.
The VNC display port can also be checked by:
sudo virsh vncdisplay ubuntu-vm
Output:
:0
From your client computer, connect to VM through TightVNC Java Viewer:
java -jar tightvnc-jviewer.jar -port=5901 -host=192.168.1.100
7. Modify VMs memory, vCPU
List VM configuration at first:
$ sudo virsh dominfo ubuntu-vm
Id:             2
Name:           ubuntu-vm
UUID:           6013be3b-08f9-4827-82fe-390bc5a86de6
OS Type:        hvm
State:          running
CPU(s):         4
CPU time:       42318.4s
Max memory:     2097152 KiB
Used memory:    2097152 KiB
Persistent:     yes
Autostart:      disable
Managed save:   no
Security model: apparmor
Security DOI:   0
Security label: libvirt-10b64982-a04c-4f2d-b8b0-c5c4b154ca25 (enforcing)
7.1 Modify memory or vCPU for an active VM
# Increase memory to 4 G
$ sudo virsh setmem ubuntu-vm 4096M

# Increate vCPUs to 8
$ sudo virsh setvcpus ubuntu-vm 8

# Decrease memory to 512 M
$ sudo virsh setmen ubuntu-vm 512M
7.2 Permanent modification
If you’d like to preserve the modification, you have to edit the VM configuration.
Poweroff the VM at first:
$ sudo virsh shutdown ubuntu-vm
Then edit the VM configuration with:
$ sudo virsh setmem ubuntu-vm 4096M --config
Or edit configuration file:
$ sudo virsh edit ubuntu-vm
- For memory, edit
<memory unit='KiB'>2097152</memory>
- For vCPU, edit
<vcpu placement='static'>4</vcpu>
Next start the VM to check the modifications:
$ sudo virsh start ubuntu-vm
8. Useful commands
8.1 List all VMs/domains
$ sudo virsh list --all
8.2 List running VMs/domains
$ sudo virsh list
8.3 Shutdown the VM/domain
$ sudo virsh shutdown ubuntu-vm
8.4 Start VM/domain
$ sudo virsh start ubuntu-vm
8.5 Suspend VM/domain
$ sudo virsh suspend ubuntu-vm
8.6 Soft (safe) reboot VM/domain
$ sudo virsh reboot ubuntu-vm
8.7 Hard (not safe) reset VM/domain
$ sudo virsh reset ubuntu-vm
8.8 Delete/remove VM/domain
$ sudo virsh undefine ubuntu-vm
$ sudo virsh destroy ubuntu-vm
Note: The virtual disk can not be deleted automatically. You need to run:
$ sudo rm /data/vm/images/ubuntu.qcow2
8.9 More commands of virsh
$ sudo virsh help
A. Reference
- Debian Wiki: KVM
- How to install KVM server on Debian 9/10 Headless Server
- How to Install and Configure KVM on Debian 10 (Buster)
- Linux man page: virt-install
- Linux man page: virsh
- Red Hat Document: Configuring and managing virtualization
- How to Add Memory, vCPU, Hard Disk to Linux KVM Virtual Machine
- Linux KVM – How to add /Remove Memory to Guest on Fly ? Part 8
- Debian Wiki: Bridging Network Connections